A quick guide to commercially available pressurized growlers, and how to make a simple one of your own using a mini-keg and a few specialized parts.
Originally Posted: Oct. 12, 2020

Table of Contents
Intro
Many homebrewers switch from bottling to kegging at some point in their brewing careers. I’ve already written about the most common reasons some homebrewers prefer kegs to bottles, but what about when you want to take your brews with you to a friend’s house, a family gathering, a party, or a competition? With a few accessories, it’s possible to bring an entire keg with you, but this can also be cumbersome. In this post, I’ve written some of my favorite options besides canning straight from the tap (which I’ve already written about here).
Transporting Kegged Brews
For transporting kegged brews, you have several options. You can take an entire keg with you and keep it in an ice bath or wrapped in an ice wrap. Bottling guns are also a good option to bottle from a keg, but they work best if you put your beer line and bottling gun in the freezer beforehand. I’m still trying to learn to use my Blichmann BeerGun properly (I mainly use it to purge things with CO2).
One of these easiest options is to do what many brewpubs do: fill a growler and take it with you. However, if you’re using traditional glass growlers with screw caps and you don’t drink the beer fast enough, your beer may go flat. Luckily, these days there are many pressurized growlers on the market that will keep your beer from going flat.
You can even use pressurized growlers to force-carbonate small batches of beer if you want (I had to do this with several cans of Belgian Saison and a batch of Apple Pie Cider that didn’t carbonate properly). This last feature also makes them great to experiment with if you have little experience with full-sized kegs and wish to practice on something smaller.
GrowlerWerks uKeg Pressurized Growler
GrowlerWerks makes some great pressurized growlers in both 64 oz. (standard growler volume) and 128 oz. (1-gallon) sizes. They’re user-friendly, especially if you don’t have any experience with disassembling kegs for cleaning and sanitizing. They only have a few removable parts, and normally you won’t need any extra tools for disassembly or reassembly.
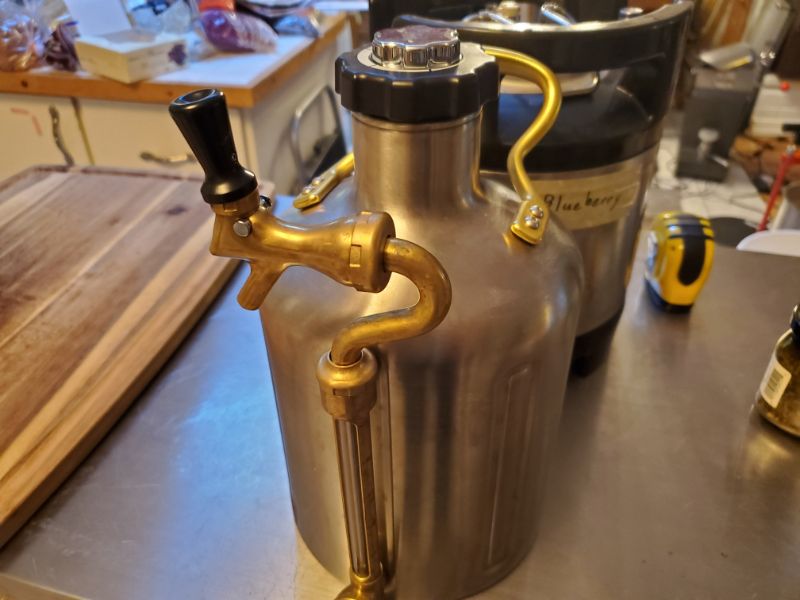
The gas cartridge housing screws into the bottom of the screw-on cap, to which the pressure control dial is mounted. Once you have a cartridge inside and your growler is filled with beer, there’s a pressure gauge at the bottom of the tubing assembly that allows you to read and adjust the pressure as needed.


Pros
- Easy learning curve. The GrowlerWerks uKeg is designed with simplicity in mind. You don’t need extra tools for general use.
- They make a great gift for the beer lover in your life.
- Aesthetically speaking, the uKeg has a great design. It has a very “Steampunk” feel to it (especially the copper colored one).
- Can take to your local brewpub and used like a regular growler.
- Nice and compact, doesn’t take up too much space in your fridge if you bring it to a party.
- Growler has a safety lock for when you’re transporting it. It keeps the tap handle from being bumped open accidentally.
Cons
- Cost: The 1-gallon version of the uKeg costs around $200 most of the time, vs around $100 or less for a similarly sized mini-Corny keg. Cost for 128 oz. at the time of writing this: $209.
- Cost again: The GrowlerWerks brand CO2 cartridges are $28 for a box of 10, or $2.80 per 16g cartridge (the size for the 128 oz. version of uKeg). There are 3rd party manufacturers for the CO2 cartridges, but reading several Amazon reviews led me to believe that it’s difficult to know for sure if they’d fit in the uKeg. Older models of uKeg have a slightly different sized cartridge housing. CO2 cartridge cost is definitely my biggest problem with the uKeg. Cost of a 10-pack (16g): $28.
- Total Cost: $237. Note: All presented costs are from Amazon at the time of writing this post (10/12/2020).
- Safety lock can get a little stuck, especially if the growler has been under pressure for a while. A couple of taps from a rubber mallet can help this, but be careful.


Mini-Keg Alternative

The main factor in my seeking out an alternative to my GrowlerWerks uKeg growlers was the cost of the CO2 cartridges. I already owned a PicoBrew 1.75-gallon mini-Corny keg that I had originally gotten to force-carbonate small batches of homebrew, and decided to try and use it as an alternative to the uKeg.

Parts
- 1.75-gallon Cornelius keg: You can find these for between $60-ish and $120-ish. PicoBrew and Kegco make good ones. You could also use the so-called “Cannonball” style mini-kegs for around $60, but keep in mind they’re much wider (around 9″ in diameter) and will take up more space in your fridge or kegerator. Cost: $90 from KEGMAXS, or $120 (with shipping) from Kegco.
- Tap Handle with keg post attachment: This is a tap handle that fits directly on a keg’s liquid “out” post. Be sure to vent the pressure from the pull-ring on the keg’s lid before attaching this part, or buy a Perlick faucet with flow control to make sure you don’t instantly start spraying foam everywhere. Cost for basic faucet: $21. Add $70 if you wish to replace the faucet with a Perlick flow control faucet.
- Mini-Gas regulator with keg post attachment: There are two main types of mini-regulator on the market: the threaded kind and the kind with plastic CO2 cartridge housing. I prefer the threaded kind because you can buy any size of threaded CO2 cartridge and it should fit. Cost: $28.
- CO2 Cartridges: Unlike the uKeg, you can buy any size of CO2 cartridge and it should work. Packs of 10 threaded cartridges from a bicycle supply store will work fine. Cost for a 10-pack (16g): $12 – $17.
- Total Cost: $151 most basic, $186 (for Kegco keg and more expensive CO2 cartridges), $256 (for Kegco keg and upgraded Perlick faucet). Note: All presented costs are from Amazon at the time of writing this post (10/12/2020).


Pros
- Cost: Buying all the necessary (basic) parts is cheaper than buying a single 128 oz. GrowlerWerks uKeg. Buying new CO2 cartridges will also save you A LOT of money in the long run.
- Easier to clean thoroughly. Once you take the lid off, you should be able to reach your whole hand/arm inside if it needs a scrubbing (though I usually just give all my kegs a good PBW soak after use).
- Can hook the keg itself up to your existing kegging equipment, including standard 5 lb. CO2 tanks/regulators for carbonation or your kegerator for serving on tap.
Cons
- Requires a little more knowledge about working with Cornelius kegs. If you already have experience with kegging, you’re good to go. It’s also a cheap way to learn kegging if you’re a small-batch brewer and want to get some kegging experience.
- Requires some extra tools, like deep socket wrench bits.
- With all the bits attached, can take up more space in the fridge.
- Unless you buy the $70 flow control Perlick faucet upgrade, you don’t really have a safety lock. Of course, you can transport the set-up in pieces, but you still need to be careful when attaching a regular tap faucet, so you don’t get foam everywhere. Venting pressure before attaching is also helpful in this situation.

Other Options
Companies like NutriChef and TMCRAFT make their own version of the pressurized growler/mini-keg that are sort of a half-way point between the options I described above. They use a single-piece cap that handles both the tap and the gas regulator, and it seems to fit the top of the keg more similarly to the D-system drop-in valves used in half-barrel kegs and 1/6 barrel torpedo kegs.
These seem like good systems and get good reviews, but since I have no personal experience using them at this time, I’ll have to leave a review until a later time.
