Home canning made easy: A written guide to setting up and using the Cannular Can Seamer.
Originally Posted: Sept. 28, 2020

Table of Contents
Intro
In the course of your homebrewing career, you may begin to look beyond simple bottle conditioning to more advanced methods of containing your brews. Many choose kegging as the next step in their journey, and this is a great way to keep fresh beer on tap all the time.
However, you may miss the ease of taking a few of your brews with you to parties or to a friend’s place. Some brewers find creative ways to fill bottles or growlers from a keg, but those methods aren’t without their challenges and drawbacks. Even the well-designed Blichmann BeerGun has a bit of a learning curve to it.
This is where home canning comes in. We finally live in an age where a homebrewer can find several models of home can seamers to choose from. When I finally decided to take the plunge into canning my brews, I researched several can seamers and settled on Kegland’s Cannular Can Seamer.
Useful Items
Before I get into the meat of this article, if you’re considering getting a can seamer there are several items I suggest you get first.
- Metric Feeler Gauge: this is a tool used to measure gaps. You’ll need one of these when setting up your can seamer.
- Kegerator: not strictly necessary, but when friends ask me what I think of my Cannular, I recommend they already own one of these. It makes trouble-shooting much quicker and easier.
- Storage Space: not technically an item, but aluminum cans come in large boxes (almost 2ft3). You’ll want a place to store these.
- Angle Grinder: the people at KegLand suggest using one of these to cut a small cross section of a partially-sealed can (first operation only) to measure the “actual overlap” of the seal with a caliper. I tried this, but it was incredibly difficult to judge the seal visually. You can try this if you want, but I wouldn’t recommend going out and buying a new angle grinder just for this test (like yours truly did).
- I recommend testing your cans’ seals by listening for leaks or applying some soapy water instead.
- ¾” Deep Socket & Socket Wrench: this is the easiest way to reach past the drive-belt to one of the bolts you’ll be adjusting during set-up. I recommend buying a whole set because they’re also indispensable when kegging. I believe the closest metric socket is 19mm.
- A second person: when adjusting the left-hand roller inside the machine, it’s helpful to have a second person to hold the upper lever back for you. I didn’t, but I think it would’ve been helpful.
Benefits of Cans
Cans are cheap and versatile containers, which is why they’ve been used by breweries for years. Even the craft beer industry has been catching on in recent years, reversing a long-held attitude that cans are for inferior beer.
Pros
Protection Against Light
Cans block out all light, preventing UV from “skunking” your beer’s hop particles. This makes them a good vessel when cellaring some high ABV homebrew. Even brown bottles let in some light, but with cans it doesn’t matter how much time they spend in the light. Note: you still don’t want said light to heat up your cans too much.
Weight
Cans are lightweight compared to glass. If you drop a can, usually you’ll just have a dented can rather than an explosion of beer. They don’t shatter like glass.
Sustainability
Aluminum cans are 100% recyclable. Glass is too if you want to get technical about it, but it often ends up in landfills because it’s less economical to recycle.
Ease of Transport
Having the option to can brews directly from my kegerator has made it much easier to bring my brews to parties and family events. It was also a great way to store an entire 5-gallon batch of the sparkling version of the Mango-Habanero Mead.

Cons
Cost & Storage
The main drawback to canning your homebrew is the initial cost of buying a can seamer, plus the cost of buying aluminum cans in bulk. You also need a place to store those large boxes of cans. I’m not sure I would recommend canning if you live in a small apartment.
A Proper Seal (in the Beginning)
Another piece of advice comes from my experience calibrating my can seamer: you need a way to test if your cans are sealing properly. I recommend one of two ways of doing this: either by “can conditioning” a small (i.e. one gallon) batch of beer, or by already owning a kegerator to fill cans with. Either of these will allow you to listen for leaks, or you can apply some soapy water and watch for bubbles.
If your cans aren’t sealing properly, you’ll know you need to make some adjustments.
Reusability
Aluminum and glass are both 100% recyclable. However, you can’t reuse aluminum cans the same way you can with glass bottles.
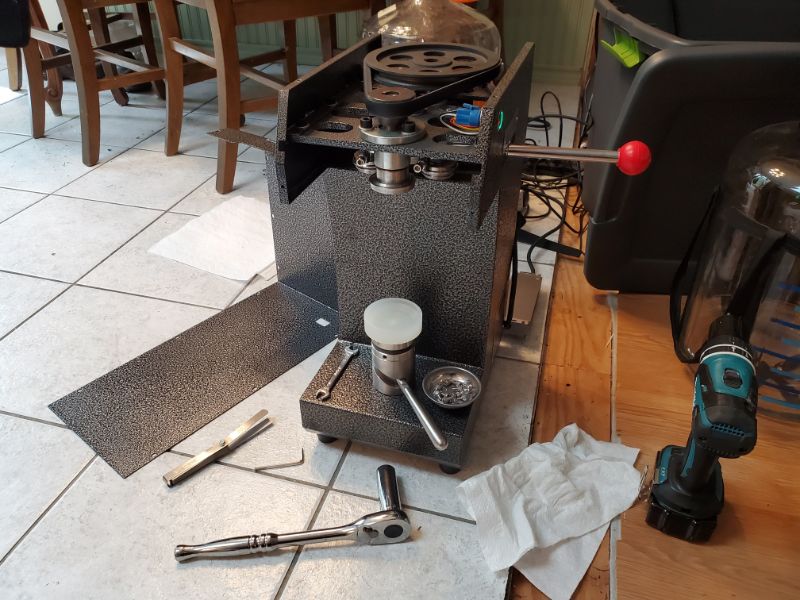
Setup
Here’s the main reason I chose to write this article: I got tired of searching through Kegland’s (admittedly informative and comprehensive) video looking for specific numbers. According to the video, specific dimensions and written instructions exist in the manual. However, my Cannular kit didn’t include the manual, so I’ve chosen to write my own version.
Note: The North American (and I think Australian/New Zealand) market uses B64 lids while the European market uses CDL/CDLE lids. You’ll want to buy the lids and upper chuck that match your market.

- Your box should include the following:
- Can seamer
- Levers
- 3-piece bearing
- Plastic platform die (this is what the can sits on). The included platform is designed for 16 oz. (500mL) “tall-boy” cans, but another platform for 12 oz. (330mL) cans is sold separately
- 24V DC Anderson socket power supply
- Note: at the time I bought my Cannular, the 110v plug for the power supply was sold separately, so make sure you get both.
- Make sure machine is unplugged, then us Allen wrench to loosen all the bolts holding the casing on the top/back of the machine.

Lower Table Adjustments
- Minor adjustments can be done by loosening the “coupling nut” in the can base (this is the metal ring with four holes spaced around it). You can loosen it by inserting an Allen wrench into a hole and hit it to the right.
- You can now rotate and reposition the entire steel table up and down by twisting it. When you get a position you like, you can lock the coupling nut by twisting it clockwise (looking down) and reversing the Allen-wrench-hitting action. Make sure to hold the upper steel table with your left hand while you re-tighten the coupling nut (downward) with your right hand.
- Test this out with a can in the plastic platform. You want to position the can so that it’s snug against the upper chuck and reasonably concentric with it. You don’t want it so snug that it buckles/dents the side of the can.
- If positioning the can this way is giving you trouble, there’s also some Allen nuts underneath that you can loosen to adjust. I try to avoid messing with these as much as I can, though.
Upper Roller Adjustments (Important***)

- The roller on the left side is engaged in the first operation when seaming a can. This roller is the most important one, and you will need a feeler gauge to get this right.
- There’s a large nut above the left-hand roller that can be reached with a ¾” deep socket wrench. Loosening this allows you to twist the roller to adjust it in the “Y-direction”, or up and down. You want to adjust the Y-gap before you adjust the X-gap. (See fig. 1 below)
- There is a lock nut in front of the left-hand roller that you can loosen with an Allen key and wrench. This allows you to adjust this roller in the “X-direction” (towards or away from center chuck). (See fig. 2 below)
- When pushing the upper lever back, your left roller will engage with the center chuck. Here are the values you want:
- Y-gap: 0.05mm – 0.15mm (about 0.0002in to 0.0006in). This can be tested with a folded piece of paper, or by turning the drive belt and making sure the spinning chuck doesn’t also spin the roller (just barely offset). (See fig. 3 below)
- X-gap: 1.15mm (about 0.045in). This is where the feeler gauge comes in handy. You may need to stack several of the feeler gauge’s leaves together to add up do this number. (See fig. 3 below)
- You could test the “actual overlap” at this point using an angle grinder and caliper. You’re shooting for at least 0.4mm in actual overlap. However, I think listening for leaks after filling cans is a better way to troubleshoot. (See fig. 4 below)
- The right-hand roller doesn’t need to be as closely toleranced as the left-hand roller. You can simply eyeball it to see if it needs adjustments. Basically, you just want the “middle lip” of the roller to be lower than the top shoulder of the center chuck. (See fig. 5 below)
Adjustment Visual Aid
Fig.1


fig.2

fig.3


fig.4

fig.5

How to Use
- Sanitize cans and lids. I like to sanitize them one at a time as I fill them, but that’s just me.
- Fill with beer per your preferred method:
- My favorite method is to fill directly from my kegerator tap using a length of 1/2″ ID silicone hose. This takes some practice to reduce foam, but I’ve gotten fairly good at it. If you plan on aging your brew, purge the can with CO2 before filling, then add a little extra CO2 on top before placing the lid on.
- If you’re good with something like a Blichmann beer gun, use that. I’m still trying to understand the beer gun’s learning curve at this point and have gotten nothing but foam a few times.
- I’ve read that keeping the beer gun and liquid line in the freezer for a few hours helps reduce foam. Placing cans in the freezer for a while also helps (if you have enough room).
- You can also “can-condition” beer, just like bottle conditioning. You want to make sure that your can seamer settings are creating a good seal first, or your beer won’t carbonate correctly.
- Place can and lid on the plastic platform. I like to twist the lid a little to make sure it’s closely fitted to the top of the can.
- Turn lower lever to raise can and lid up to the chuck.
- Press “on” button on the right side.
- Press red-knobbed lever back and hold for 2 seconds, then pull it towards you for another 2 seconds.
- Voila, your can should be perfectly seamed.

Tips & Tricks
These are all found throughout this article, but I felt I should list them all in order to sum things up.
- Use small-batch can-conditioning to test your cans’ seals. Listening for leaks is much easier than trying to cut a cross section in your seal and measuring the overlap visually.
- Alternatively, have a kegerator to fill cans from before you get a can seamer. Test seal the same way as you would with can-conditioning.
- Cans are easy to fill from a kegerator using a short length of ½” silicone tubing. The tubing fits even easier if you’ve swapped out your regular tap faucets for Note: I recommend swapping out all your faucets with Perlick faucets. They may cost more, but they’re less likely to seize up at inopportune times.
- Have a method for purging cans with CO2 if you want to increase the shelf life of your brews. I use a Blichmann beer gun that I originally bought for purging and filling, but I’m still learning how to use the filling function properly.
- Apply food-grade lube to bearings periodically.
- I like to keep the tools that came with the Cannular stuck to its left side with a neodymium magnet.


