Some tips for brewers thinking of taking the plunge into kegging homebrew (and a few keg pitfalls to avoid).
Originally Posted: Oct. 12, 2020

(Note: This is a very, very basic tutorial meant for beginners with no experience with kegs. The info here can be found on countless homebrew websites and YouTube channels, but a few of the troubleshooting tips are based on personal experience (read: mistakes) and a few took quite a bit of Google searching after said mistakes. With this post, I wanted to put all of the info in one easy-to-find place.)
Table of Contents
Intro
For the beginner homebrewer, bottling is often the first step one takes for storing, conditioning (carbonating), and transporting brews so they can be enjoyed by others. However, many homebrewers eventually make the switch over to kegging, though kegs can be intimidating for beginners. Kegging has several advantages over bottling:
- Cleaning and sanitizing bottles for every brew can become a hassle. Kegs are much easier to clean and maintain (cleaning and sanitizing 1 Corny keg vs cleaning and sanitizing ~60 12 oz. bottles for a 5-gallon batch).
- Kegs are much more robust. If you drop a keg, it may dent, but it won’t shatter.
- With kegs, you can force-carbonate a brew that you’ve had to add potassium sorbate and potassium metabisulfite to. These additives act as preservatives in beers and wines, and can save your brew from a wild yeast or acetobacter infection, but you won’t be able to bottle-condition to carbonate.
Of course, kegs also have their disadvantages:
- Cost: The up-front cost of a kegging system can set you back more than $200 (unless you find a good deal on Craigslist. Brewers sell off their old equipment all the time, so if you don’t mind dealing with used products, I recommend keeping an eye out).
- Kegerator: To truly get the most out of kegged homebrew, you’ll probably want to buy or build a kegerator at some point. A kegerator allows you to chill your brews down to a reasonable serving temperature (try serving from a room temperature keg and you’ll get a whole bunch of foam). However, buying or building a kegerator will add more to your up-front cost.
- Transporting Brews: Once you have your kegging system up and running and ready to serve, you still may want an easier option to taking brews with you to a party or competition. Many people have a favorite option for this, such as bottling straight from a keg with a counter-pressure bottle filler or Blichmann BeerGun (though I’m still learning how best to use these). There are also options for pressurized growlers and mini-kegs that can work well with your existing kegging set-up.
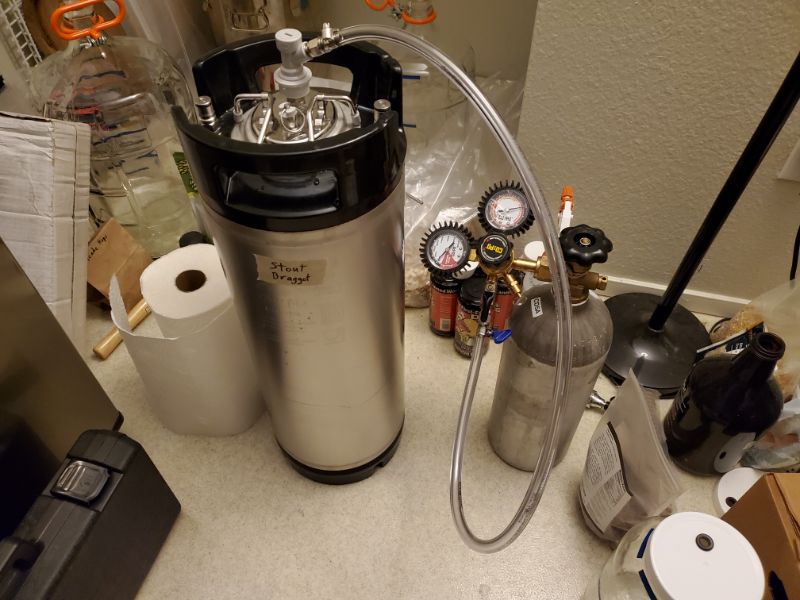
Cornelius Keg Parts Description
The most common keg used by homebrewers is the Ball Lock 5-gallon Cornelius keg (often referred to as a Corny keg for short). These kegs were originally used to transport Pepsi cola to restaurants and soda fountains but were rendered obsolete for that purpose when the soda industry switched to flavored syrup-injected soda water in soda machines. The Coca-Cola designed pin-lock keg is sometimes uses as well, but these are much less common for homebrewers.
Basic Parts
Posts
Chances are that the kegs that first come to mind for many people are the half-barrel kegs you’ve probably seen at bars, restaurants, and old-school keggers in movies. These half-barrel (15.5-gallon) kegs use a single coupling for both the CO2 and liquid lines, known as the D-system drop-in valve.
By contrast, the Corny keg has two “posts” for hooking them up to gas and liquid lines. The gas “in” post has notches in the hex nut to differentiate it, and its diameter is (I think) 1mm larger than the other post. The other post, the liquid “out” post, doesn’t have these notches. Try not to mix these up.

The posts have three small parts to them: the post body, a spring, and a “poppet” at the top. The post body screws onto one of the threaded male parts on the top of the keg, and the spring keeps the poppet inserted into the post body’s hole. The easiest way to get the post assemblies on and off the keg is with a deep socket bit. The two most common sized bits I’ve needed are 11/16” (maybe ~17mm) and 7/8” (22mm) deep sockets.

Lid
The Corny keg also has an oval-shaped lid between the posts. The lid is kept on or taken off using a simple mechanical lever, and an O-ring completes the seal. The lid also has a pressure relief valve attached to a little key-ring. Use this to vent excess pressure whenever you need to.
Metal Tubes
Underneath the liquid “out” post is a long tube that should reach the bottom of the keg. The longer “out” tube can be sanitized in a sink or other container filled with sanitizer solution (flipping it as needed so that both ends soak at some point). Underneath the gas “in” post is a short ~1in tube. I like to sanitize this in a small glass along with both posts when I’m about to fill a keg.


Upgrade Parts
Carbonation Stone Lid
My favorite keg upgrade is the carbonation stone lid. It’s like a basic lid, except that in the middle there’s another gas “in” post. On the underside of the lid, this attaches to a length of tubing and to a carbonation stone. When attached to a CO2 tank and regulator, the assembly injects much smaller CO2 bubbles into solution, speeding up carbonation a great deal.
Floating Dip Tube
Instead of using a metal “out” tube, some brewers choose to swap out for a flexible dip tube with a float bladder attached. The purpose of this is to dispense beer from just below the surface of the liquid, instead of directly from the bottom of the keg. This is so you’ll have clearer pours with less sediment.
I haven’t played with one of these myself yet, so this description is based off what other homebrewers have said.

Filling Your Keg
Before filling your keg, make sure to disassemble it and sanitize all its smaller parts (including the liquid tube) as well as the keg itself. Reassemble the keg, then simply siphon your beer (or another beverage) into it. After siphoning, place lid (or carbonation lid) back on keg.
Once you know what you’re doing, disassembling and reassembling a keg should take less than a minute each. It just seems intimidating at first.
Carbonating Your Beer (or Other Beverage)
Attach your gas “in” line to your regulator and your regulator to your CO2 tank. From here, there are several methods to carbonate your beer:
Traditional “Slow” Method
For the traditional carbonation method, you’ll need a kegerator or some other way of keeping your beer chilled, and your beer will be carbonated in a week or two. Place beer in kegerator and attach your gas line to the gas post, then set your regulator for the preferred carbonation level for that style of beer.
Quick Method (Room Temperature)
Attach your gas line to either your gas OR liquid post (you can do this with your gas line, but not your liquid line). Then crank your regulator up to 30psi and, for quickest carbonation, roll your keg around on the floor for at least 5 minutes. You should hear bubbles flowing through the beer, and you can use this to gauge when you’re done.
Repeat a few times if you wish and keep an eye on what the regulator gauge says while rolling your keg (it’s an interesting learning experience for how gasses behave in solution). If you carbonate at 30psi at room temperature, once you chill your beer down in the kegerator it should be closer to a more reasonable 12psi.
Quicker Method (Carbonation Stone)

Same as the above method but using a carbonation lid. Attach gas line to the gas post in the lid. I’ve just left it like this and carbonated a beer in less than 24 hours, but I’ve gotten quicker and more consistent results rolling the keg around on the floor.
Cleaning Your Keg

When I get a new keg, I soak it in a solution of PBW for a few hours. I also do this every once in a while afterward, especially if the keg smells strongly of its most recent beer.
However, just for general use it’s okay to disassemble the keg and give it a quick rinse with water, sanitizer solution, and more water.
If using a carbonation stone, I boil the stone before its first use and then every once in a while afterward to clear off any hop oils or grime.

Common Troubleshooting
Keg Leaking Gas
The two quickest possible solutions that come to mind for this are: swap out your O-rings (they can get old and brittle, preventing a good seal) or lining your O-rings with some food-safe keg lube.
Keg Not Carbonating Enough
If your beer is coming out of the keg undercarbed (and you’ve already checked for leaks), try hooking it back up to your CO2 tank and regulator and rolling it around on the floor for a few minutes. You should be able to hear how many CO2 bubbles are making their way into the beer, so judge your progress using that.

Mixing Up the “In” and “Out” Post
The Cause
They say that this is a mistake you only make once, and I made it recently. As stated earlier, the gas “in” post is about 1mm larger in diameter than the liquid “out” post. If you mix these up during reassembly and then try to force the liquid line coupling on the wrong post, you’ll have a hell of a time getting it back off (Side note: near-boiling water usually does the trick).
The Solution
The obvious solution is to just pay closer attention to which post you’re screwing on where, but if you’re like me, you’ll want some extra visual cues. After searching online for some solutions, I read that some brewers like to put a specific color of O-ring on their gas posts.
I took this a step further and placed some 1/8” blue electrical tape in several spots around the vicinity of my gas posts. I also used a label maker to places more obvious “in” and “out” labels near the posts.


