Some usage tips and potential modifications for new and prospective users of the original Grainfather.
Originally Posted: Aug. 10, 2020

Table of Contents
Intro
The Grainfather is an all-in-one brewing system. It was one of the earliest ones to hit the market and be of decent quality, and the original model continues to deliver. It has a suite of upgrades available for it that can make brew day a breeze.
However, it’s not without its quirks. It seems that every brew day presents at least one minor irritation that I need to troubleshoot, and it’s usually a different thing every time. Some of the factors that I suspect cause this are: using different combinations of DIY filtration set-ups, different grain bills (maybe?), the amount of hops a given recipe calls for.
Heating (Mash & Boil)
If you’re using the 110V of the Grainfather sold for the North American market, it can seem sluggish to get water to mash-in temperature and to get wort to a rolling boil. To remedy this, there are a few add-ons you can buy as well as simple hacks using household supplies or other brewing supplies you may already have on hand.
List of Helpful Items
- Grainfather’s insulating “Graincoat”
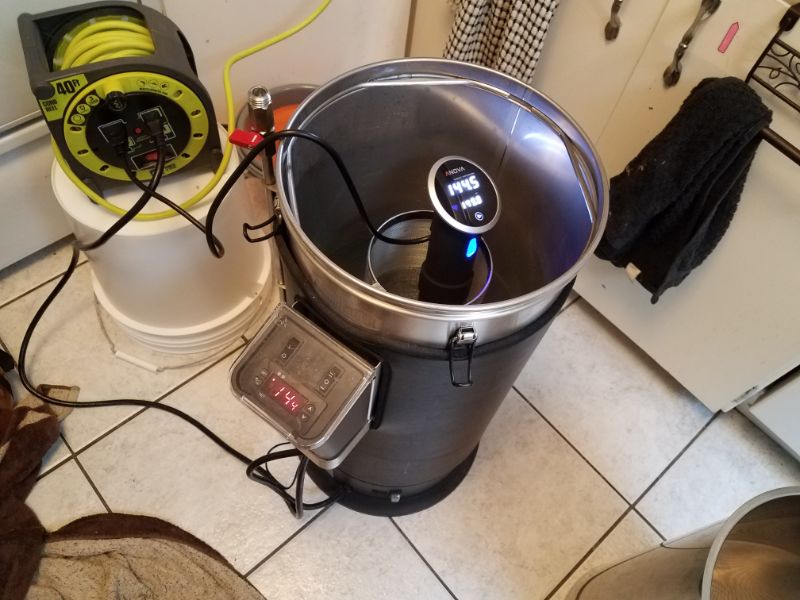
- A sous vide circulator (I use my Anova)
- Bath towels (for insulation, but also have some on hand for quick cleanup)
- A rubber stopper, undrilled
- Hot tap water

Heating Mash Water
Heating up mash water from cold can take a while, but a few hacks I’ve found to speed things up include:
- Using Grainfather’s official “Graincoat” insulation jacket, or similar insulation. This will help build and keep temperature during both the mash and the boil.
- Using the hottest tap water that you can. My tap water runs somewhere in the low 130s°F, which gets me quite close to the 140 – 158°F required for mashing.
- Note: If you use tap water in brewing, throw half a Campden tablet into your mash tun (and the other half into your sparge water) to denature any chlorine and chloramine your water supply may have. You can also use powdered Potassium Metabisulfite (chemically the same as Campden).
- Alternatively, you can use a sous vide circulator to quickly heat the water to the level you need. One caveat to this method: I’ve found that after you reach your desired temperature, the Grainfather’s built-in heating element may not be going at full power, so you may lose a few degrees at mash-in.
- While heating, sometimes I like to plug the hole in the Grainfather’s glass dome with an undrilled rubber stopper and then drape a folded towel over. I also use this method when getting most of the way to a boil, but the downside is that it might affect your boil-off liquid levels by trapping them.
Heating to a Boil
Of the above methods for getting your mash water heated, several of the methods also apply to getting to a boil. The Graincoat also lends its insulation towards getting your wort to a boil. I wouldn’t suggest using a sous vide circulator getting to a boil (you may coat your heating element with burning sugars, for example).
Adding hot sparge water will bring your temperature up a bit, as this should be hotter than the ~130°F my tap water will get to. However, you can only add so much sparge water, as your Grainfather water calculator should have already calculated the proper volumes of both mash and sparge water before you even begin brewing.


As mentioned above, plugging the glass dome’s hole with an undrilled rubber stopper and covering with a towel will lend extra insulation, but keep in mind that it’s also trapping water that would otherwise boil off. I would only suggest doing this while initially getting up to a rolling boil. Another potential problem with this method is that you may need to visually check your wort often to make sure you’re not going to have a boil-over. If you have the Grainfather Connect controller, you don’t need to check the boil as often because you’ll be able to see the temperature on your phone or tablet.

I eventually upgraded to the Grainfather Connect controller, partially because I wanted to see if it was a more accurate/sensitive temperature controller and partially to test if I could set it to automatically have my water heated for me at a set time in the morning (Note: I still haven’t done this second test, I’ve been brewing on a whim too often lately). Here’s an important tip for getting to a boil that I only noticed during my last two brew days: if you’re having trouble getting to the full 212°F and staying there, check the power level bar on the right side of the screen. If it doesn’t say “100%”, hit the “up” temperature button on your phone app and it should go to 100%.

- TLDR Version:
- Graincoat will help insulate
- Sparge water will add some heat
- Undrilled rubber stopper and folded towel can keep heat in while getting up to boil, but should be set aside after. Check often for boil-over.
- If you have the Grainfather Connect controller, make sure the power level bar on the right of the screen says 100%
Sparge Water Heating
If you’re unfamiliar with the term, “sparging” is when you slowly sprinkle hot water over already-mashed grain after it’s been removed from the wort to extract any fermentable sugars that might still be hiding in the spent grain. It’s a very common practice, though not universal (look up “no-sparge brewing” to see if it’s something that might interest you).
I always sparge. You get more fermentables from the grain you bought, and you increase your brewhouse efficiency (basically, the fermentables you managed to extract from a given weight of grain). The first time I used my Grainfather, I had to use a sort of DIY set-up to get my sparge water: I heated water in batches using my tiny electric water kettle and kept it warm in a plastic drink cooler. It was a lot of extra work.


After that first brew-day, I eventually decided that life would be much easier if I upgraded to an electric sparge water heater. I can’t remember if I just passed it up when I first bought the Grainfather or if the product came out later on, but Grainfather makes a great automatic sparge water heater with automated temperature control. Still haven’t regretted that purchase.
Just remember to always turn your sparge water heater ON at the beginning of your brew day, right after you fill it.


Filters and What to Do About Hop Trub
One thing you need to consider in any brewing set-up is hop sediment. In the case of pellet hops, they break up during the boil and form a wet-powdery sediment that can pass through or clog any holes that aren’t fine enough. In the case of whole hops, you need a lot more of them to make the 1 – 2 oz. that many recipes call for, and that translates to a large mass of hop trub. I’ve tried several methods to reduce the chance that hop trub will clog my Grainfather’s included filter, and some of them have worked better than others. Here are my findings:
First off, if you think that your Grainfather’s pump filter seems clogged when using the recirculating arm or counterflow wort chiller, use a plastic syringe inserted into the end of the hose to blow out the clog. I believe learned this tip from a David Heath Homebrew video.


I’ve had the best results using a fine-mesh “hop spider”. For those who don’t know, a hop spider is a mesh basket that hangs into the boiling wort from the side of a boil kettle. When using pellet hops, some sediment will still get through the mesh, but it’s a very manageable amount. Just remember when adding your hops to stir within the hop spider and then stir the rest of the brew kettle to help the hop oils and alpha acids distribute throughout the wort.
Many brewers also swear by the filter plate build for Robobrew’s Brewzilla all-in-one brewing system. It’s just one of many parts that happen to fit both the Brewzilla and the Grainfather; it has a low enough profile to fit over the Grainfather’s filter cylinder and underneath the grain basket without causing any interferences. This tip also came to me by way of a David Heath Homebrew video.

However, the filter plate that I purchased to test out may have been a cheaper knock-off; supposedly Robobrew filter plates are supposed to be heavier than the one I have, and mine tends to flop around a lot when I do any vigorous stirring by hand or with the whirlpool drill attachment. I’ve found a workaround to this: I purchased a few sets of low-profile silicone-and-steel sous vide weights that I hoped would keep the filter plate stationary during vigorous stirring. However, this workaround has given inconsistent results.


Even when the plate stays in place, I’ve had heating element problems due to the fact that you can’t scrape the bottom of the Grainfather with the plate in the way. Many other brewers have never had this problem though, so it could vary from Grainfather to Grainfather. It could be worth experimenting with yours.
A third method I tried was to use a set of cylindrical tea strainers, the kind that are supposed to hang over the side of a tea pot. This didn’t work well; my pellet hops simply swelled up and packed the inside of the strainers, likely preventing the hop oils and alpha acids in the core from making their way into the beer.
End result: a hop spider is probably your best bet, but you may want to add 10% more hops than a recipe calls for due to the imperfect “hop utilization” that hop spiders are known for.
Camlock Conversion Upgrade
The Grainfather uses a threaded post at the top of its recirculating pump assembly to attach to both the recirculation arm and the counterflow wort chiller; in both cases, you just screw them on to the threaded post. However, the threads can wear out over time (something that began happening with mine), or you can accidentally damage some spot-welded supports by twisting too hard.
To prevent this, and also to make it easier and quicker to swap out attachments, many Grainfather users have built or purchased “camlock conversion kits” to replace their threaded post and attachments. I’ve been pleased with this upgrade since I got it, but I had to purchase an extra steel part that wasn’t included in the kit. I also had to use a short length of silicone tubing and some hose clamps I already had on hand, so if you need to make the modification that I did you might need to buy extra silicone tubing and hose clamps.
If you buy the pre-made conversion kit, all you need to do is unscrew the threaded post and screw on the female end of the camlock (this is the part with small arms that swing out). If you build this assembly out of separately purchased parts parts, you’ll have to assemble them before screwing the assembly on.

To modify your recirculation arm, you can either use a hacksaw to cut off the mating end and slide off the threaded ring, or you can purchase the Robobrew Brewzilla recirculation arm. I did the latter because I didn’t want to make a mistake and be stuck with no recirculating arm.

Replacing the threaded end of the counterflow wort chiller proved more challenging than I anticipated. Using some scissors to snip off the end with the threaded ring was easy, but I couldn’t get the barbed end of the camlock male connector to fit inside the silicone tubing. So, I came up with this janky little solution:

This was where the extra steel part, the hose clamps, and the short length of larger (I think ½ in. Inner Diam.?) silicone tubing came in. The steel part is a 304 stainless ½ in. to 3/8 in. barbed reducer, I believe. So far this assembly has held up perfectly; no leaks or any other problems.
Whirlpooling
“Whirlpooling”, which is exactly what it sounds like, is considered good practice in any boil kettle. It aerates the wort and it helps hop sediment form a single, roughly conical mound in the middle of the bottom of your kettle. Traditionally this is done by hand with whatever stirring spoon or paddle is used during the boil stage.
To make things easier on your arms, there are many drill attachment options out there (paint mixers, for example), but you’ll want to make sure that the one that you buy is food safe. If you’re looking at stainless steel options, the most common food safe material is 304 stainless steel. The whirlpool attachment I use is the Grainfather one, because I was having a hard time finding a food safe paint mixer at the time.
There also exists a “whirlpool arm” attachment that exists for the Robobrew Brewzilla that would fit the Grainfather if you’ve done the camlock conversion. However, I have no personal experience using one, so I can’t speak to its strengths and weaknesses with a Grainfather. Might be a good experiment in the future though.
Transferring Chilled Wort to Fermenter
The way you transfer chilled wort to a fermenter after brewing is to use the counterflow wort chiller. I like to run hot wort through the chiller and back through the top of the dome in order to sterilize the inside with heat (yet another tip I picked up watching David Heath videos). After doing that for, say, 20 – 30 seconds, it’s time to pump wort into a sanitized fermenter.
Many yeasts have an ideal temperature range, so it’s useful to get the temperature of your wort within this range from the beginning. That’s why I like to use this cheap assembly:


The assembly consists of a Blichmann “ThruMometer” (a stainless steel tube with a thermometer sticker on it), a short length of silicone tubing, and a plastic “wort aerator” which helps break the wort flow up into droplets and increases the surface area that’s in contact with air. The first two pieces of this assembly were (once again) something I gleaned from David Heath videos. Really, the guy collects some cool ideas.
On a related note, when it comes to siphoning or filtering my brews, I’ve replaced almost all of my vinyl tubing with 5/16″ ID silicone tubing. It’s much more flexible than vinyl, so I can fit an entire hose in a sink full of sanitizer. I can also boil or steam it if it needs extra sterilization. I usually keep some extra tubing around in case I need to cut shorter lengths for any reason.
Something to Check if Your Grainfather or Sparge Water Heater Won’t Heat
One fateful brew day—I believe I was making my first Belgian Witbier—I had just finished the mashing stage and raised the grain basket to draining height. I went to fill a pitcher for sparge water and realized that I’d forgotten to turn the heater on. Easy mistake to make if you’re not paying attention, but I figured I’d just try turning it on and see how long it takes to get up to temperature. It wouldn’t turn on, and I thought it was busted. A short panic later, I had used the hottest tap water I could to sparge instead (remember how I said my hottest tap water gets to about 130°F?). It yielded imperfect results.
I looked up the problem after the panic had subsided to see if anyone else had ever had their sparge water heater not work. It turns out I just needed to press a reset button on the bottom:


I always turn my sparge water heater on at the very beginning of the brewing process now, right after I fill it. This way if it won’t turn on, I’ll know right away that I just need to press the reset button on the bottom. Same goes for the Grainfather itself, which also has a reset button in the middle of its underside. I think the button functions the same was as the reset button on a GFCI power outlet, but I don’t know for sure.
Anyway, it turns out it’s an easy fix.
Wrapping Up
Well, I hope this collection of tips and tricks—both my own and those inspired by other talented brewers—helps you to avoid some of the massive headaches and adult language that have resulted from my use of the Grainfather. It’s an elegant and powerful machine if you use it correctly and learn to deal with its quirks.


