Some wine rack tips and tricks for safe mead storage.
Originally Posted: 3/29/2021

I got a question on Reddit the other day on how I have my wine racks set up (they were visible in the background of a picture of Honey-Fermented Garlic Mead). Since mead is such an investment in time, money, ingredients, and equipment, I’ve chosen my wine rack setup very carefully.

Initially, I only cared about scalability in case I started making larger batches of mead (which I eventually did). Later I started to add a few safety features (both to protect my bottles and mead, and to protect myself from broken glass and messes).
Table of Contents
Item List
Here’s a full list of the items that I use in my wine rack setup that will be mentioned throughout this article:
- Stackable modular wooden wine rack
- Anti-tip furniture securing kit. Remember, you’ll need two per wine rack.
- Roll of steel wire, 1/16″ (optional: if you need a longer wire like I did)
- Aluminum crimping loops (1/16″) (if your wire or tool don’t come with them)
- Wire crimping tool (see above)
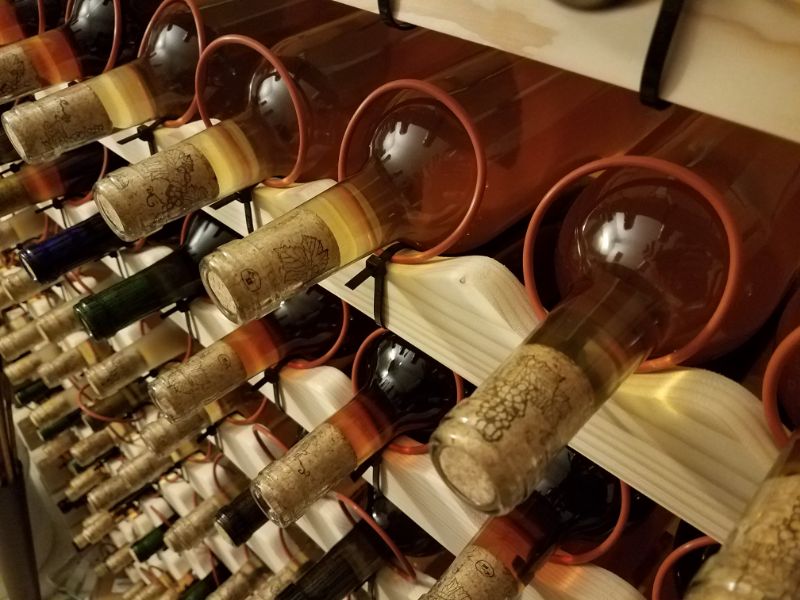
- 2.5” (or 6.35cm) I.D. silicone O-rings
- Zip-ties
- Metal binder rings (1.5” I.D., or 3.81cm) (optional, visual cue)
- Reflector tags (optional, visual cue)
Of course, there are many other options one could use to secure bottles and call attention to specific bottles. This is just the setup that I’ve ended up with over the past few years.

The Racks
I use a type of stackable modular wooden rack that I found on Amazon. Each rack has space for 72 bottles. I originally only had one rack, but I chose this model with expansion in mind. Currently, I have 4 identical racks, stacked in two-high Columns side-by-side, giving me the total capacity for 288 bottles. I also have two more racks still in their boxes just in case I ever want to expand upward. Don’t worry, I already measured between my tallest rack and the ceiling to make sure they’ll fit.

An individual wine rack measures 11” Depth by 29.75” Height by 46” Width (27.94cm x 75.565cm x 116.84cm) once you’ve assembled it. During assembly of a single rack, I use plenty of wood glue on any surface that will mate with another one: notches, holes, and dowel pins. A rubber mallet makes assembly a lot easier. I keep several of the extra dowel pins in case I plan on stacking several racks, but just to locate them together. I don’t glue two stacked racks together, because I want the option to move or rearrange them easily.
I also mark and label individual racks with tape, to make it easier to see where the top of one rack meets the bottom of another. This also helps me order my mead bottles oldest to youngest (more on that below). Currently, I have two rack “Columns”; one is made up of “Rack 1” (bot) and “Rack 2” (top), and the other is made up of “Rack 3” (bot) and “Rack 4” (top).


Disaster-Proofing
Anti-Tip Furniture Kit
The first consideration one should make with any piece of tall furniture is how to secure it to a wall. This is considered basic toddler-proofing in most cases (not that I have any kids), but it’s also useful if you live in a disaster-prone region (like I do). With memories in my head of the Nisqually Quake while I was in 7th grade English class, I decided I didn’t want to take the chance of losing all my mead to a similar quake.
Start by earthquake-proofing (or tornado- or hurricane-proofing) your racks by using an anti-tip furniture kit to secure them to a wall. I like the steel cable kits made by Hangman; they can support up to 400lbs. each, I believe.

I secured my racks directly into wall studs, but if I were to do it over again, I would’ve secured a single 2×4 to the wall studs across the entire length of the wall, and then securing the wine racks to this crossbeam. Would’ve made it a lot easier to arrange racks wherever I wanted to, and not worry about how short the anti-tip kit’s steel cables were. I had to take a roll of steel wire and cut/crimp my own, longer cables in a few places in order to reach a stud.
Using Custom Lengths of Wire
If you have to go this route, make sure you have 1/16″ steel wire, aluminum crimping loops, and a tool with a crimping function (I used a wire stripper I already had, and I think some types of pliers could be used as well). You’ll also need a pair of pliers that can cut the wire. You can often find wire packaged with crimps, or a crimping tool packaged with crimps, but no matter what you’ll need all three items (having extra on hand can also come in handy if you need to hang picture frames).

Securing Bottles with O-Rings
Now that you’ve secured the racks themselves to the wall, you’ll want to make sure there’s no way for bottles to slide out due to heavy vibration. To do this, I decided to zip-tie 2.5” I.D. silicone O-rings to each bottle trough. The O-rings loop loosely around the neck of each bottle, keeping them from potentially sliding out, but with enough slack to make it easy to place or take a bottle.

Organization
You can organize your meads whichever way works best for you, but I figured I might as well briefly describe the system I use. Starting at the bottom-left of “Rack 1”, I place my oldest bottles left-to-right. I place something as a visual cue on the last bottle of a batch, then start adding newer bottles. I fill “Rack 1” this way, followed by “Rack 2” and so on in that order. Note: If I ever get around to stacking another rack on each Column, the Columns will probably become “1, 2, 5” and “3, 4, 6” and I’ll fill them following the same order, because that seems like less effort than reorganizing everything.

The “visual cue” can be anything that helps you see when one batch ends and another begins, so you don’t have to spend as much time pulling bottles out to look at the labels. I started with just using small rings of zip-tie, but recently upgraded to using 1.5” binder rings with reflector tags attached. These stand out a lot more.

Secret/Private Stock
Separate from my wine racks, I like to keep one or two bottles from every batch of mead that I make hidden away in a closet drawer. This way, I always have some mead from each batch that will age for years before I decide to open it and see how it’s doing. Not strictly necessary, but it’s how I like to keep a little private reserve on hand.

