A guide to some common glass and metal fermenters, plus some basic fermenter tips and equipment mods to make your life as a homebrewer easier.
Originally Posted: Aug. 4, 2020

Table of Contents
Intro
Here are a few tips and tricks I’ve discovered over the years involving fermenters. I’ll start off by saying this: I’ve never used a plastic fermenter (except for my first time with a Mr. Beer Kit), and so far I’ve never had a fermentation go bad. I have five regular (narrow-necked) glass carboys of various sizes, three 7-gallon wide-mouth glass carboys, four 7-gallon stainless steel fermenters, and various 1-gallon carboys scattered around. I also have a single 3-gallon glass carboy that I use for measuring and blending batches.
There are several types of fermenters that I haven’t gotten to play with yet. For example, I hope to get a few “kegmenters” eventually so I can play around with fermentation under pressure.
I’ll update this section as my experience with other fermenters increases.
Transferring Brews
Siphon Tubing
Most auto-siphons come with a length of food safe vinyl tubing for transferring from a primary fermenter to secondary. I’ve almost completely stopped using it ever since I switched to food safe silicone tubing.

Silicone tubing is far more flexible than vinyl. When I used vinyl tubing, I’d have to soak the end in very hot water if I wanted to get it on or off the end of my auto-siphon. Subjecting the plastic end of the auto-siphon will also weaken it over time, reducing its usable lifespan.
Silicone is also flexible enough to be rolled up and submerged completely in a sink full of sanitizer. It can also be steamed or boiled if it needs some extra sterilization; for example, to prevent cross-contamination after transferring a brew fermented with Brettanomyces or wild yeast.

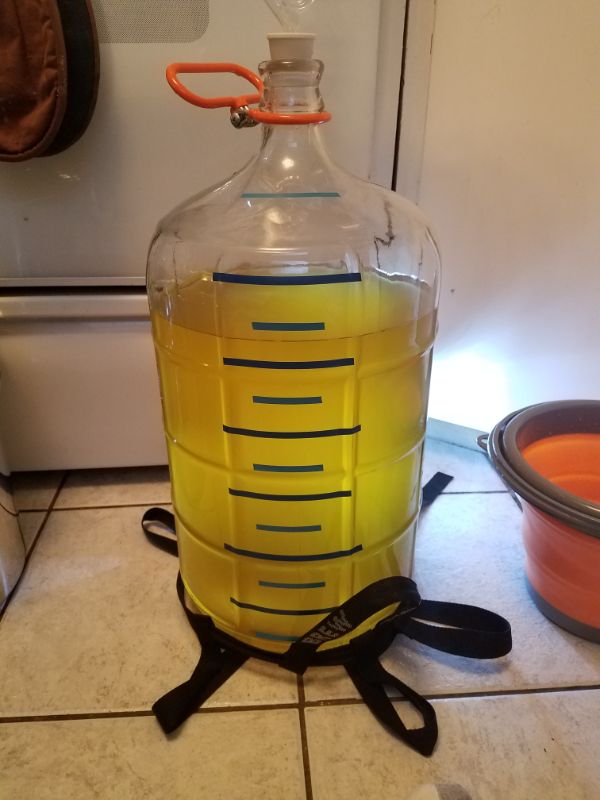
Volume Marks

In my experience, glass fermenters come in some odd sizes. I’ve purchased many glass fermenters that were nominally the same volume, but have still found slight variations in how much brew they can hold. Sometimes this can become an issue when transferring a brew from one fermenter to a similarly-but-not-quite-same-size secondary fermenter.

Instead of transferring brews and hoping I won’t have an overflow, I decided to give all of my glass fermenters volume marks, stepping up by the half-gallon. There are tutorials out there for using etching cream, but I was worried pouring hazardous chemicals down my drains (my house is on a septic system). I attempted to use a sort of glass paint, but it all peeled off (I may have been less than thorough at cleaning the carboy first; acetone might’ve done the trick). Eventually, I settled on 1/8” colored electrical tape.


Whenever a fermenter was empty, I would fill it up a half-gallon at a time, wait for the water to become still, then place a strip of electrical tape at the water level. I alternated colors between half- and full gallons. I did this to both my wide-mouth and regular glass carboys, including a 3-gallon one that I use to measure for blending.
Glass Wide-Mouth Fermenters

For a long time, these were the only wide-mouth fermenters I had. They go for about $40 – $50 or so (I’ve seen the price get as high as $80 though), so they won’t break the bank if you want to graduate from narrow-necked carboys. The opening is large enough for you to reach your entire arm inside for cleaning. The lid comes with a built-in bubbler system, a sort of reservoir to fill with sanitizer or cheap vodka. However, I usually toss the cap from that feature in the garbage and use a #3 drilled stopper in the hole instead. If you plan on aging a brew with fruit, this is the most affordable wide-mouth fermenter I would recommend.
Metal Fermenters

I have four Chapman flat-bottomed stainless-steel fermenters that I absolutely love. They’re stackable, easy to clean, disassemble and reassemble, and have volume marks already stamped on them. They give even easier access than wide-mouth fermenters, as the entire lid comes off. They keep light out, so you don’t need to fear your beer becoming light-struck and skunky. However, I’ve seen their price range between about $100 and $125. Still, much more affordable than most stainless-steel fermenters out there.
DIY Temperature Control
My favorite feature of these flat-bottomed fermenters is their usefulness in DIY temperature control set-ups. Unlike glass, metal is very thermally conductive, and I’ve put this to use with a combination of heating belts, heating pads, and insulating wraps. An Inkbird temperature controller along with a thermowell stopper complete the DIY system (these fermenters take a #10 stopper). I cut the insulating wraps from some of that aluminum insulation that looks like metal bubble wrap; 14” x 44” for the part the wraps around the fermenter, then I cut the leftover scrap into two intersecting covers for the top.


These fermenters are also easy to sterilize if you use one for a mixed fermentation. The large silicone O-ring in the lid can be taken out and placed in boiling water along with the #10 stopper, and the steel parts can be sanitized a number of ways.
Seal Troubleshooting
One hack that I have to recommend for these fermenters concerns the lid clamps. I noticed that some of them don’t clamp the lid down tight enough to form a seal (there was no airlock activity). This turned out to be a simple fix: I cut some small sections of vinyl tubing and placed these under the clamps to act as pressure pads. Problem solved.


