A savory mushroom-garlic steeped mead that’s perfect for cooking and deglazing, and is surprisingly drinkable on its own!
Originally Posted: December 16, 2023

Table of Contents
Quick Specs
- OG = 1.105
- FG = 0.998
- ABV: 14%
- Taste Profile: Savory and garlicky
- Time: 9 months
- Yield: 26+ bottles
Intro

Background
When I first got into mead-making—and brewing in general—one of the first books I bought was Make Mead Like a Viking by Jereme Zimmerman. One of the recipes that intrigued me the most was found in Chapter 7, which was devoted to “herbal, vegetable, floral, fruit, and cooking meads”. On page 122, he lists directions for what he terms “Mushroom and Garlic Mead Madness”. Since this was in a chapter that mentions cooking meads, I was immediately interested; I love cooking, and this sounded like the perfect deglazing liquid for soups and stews.
Adding Mushroom Flavor
In the recipe, he mentions several methods for using mushrooms, including rehydrating dried shiitakes and adding them straight to the mead, making a vodka tincture to draw out the flavor, or making a mushroom tea and adding that to the mead. I chose this last option, since it would allow me to use out-of-season dried mushrooms and it wouldn’t affect the ABV at all.
Choosing Mushrooms

The original recipe opts for either oyster or shiitake mushrooms, but I decided I wanted to make things interesting by adding several harder-to-obtain mushrooms: chanterelles and morels. I ordered myself (I think) two packages of each here: shiitake (link), chanterelle (link), morel (link).
However, this was before I remembered that there’s a lot of anecdotal evidence that you shouldn’t mix morels and alcohol due to their supposed hydrazine content. I opted to leave the morels out and save them for a later soup.
Future Plans
Once finished, I had a fine cooking mead which, like my straight-up garlic mead, I plan to use a lot of. My main idea involves using it in place of sherry in a sherry-cream sauce based dish or a seafood bisque. Got some langostinos in my garage freezer that I’ve been saving for exactly this purpose, so I hope to cook and post that recipe sometime soon.
Ingredients
Initial Base Mead:
- 15-lbs honey (step-fed, 10 lbs followed by 5 lbs)
- 5 gallons spring water
- Fermax yeast nutrient
- Lalvin EC-1118 champagne yeast
Mushroom Tea:
- 6 cups spring water
- 18 dried shiitake mushrooms (shiitake link)
- 36 dried chanterelle mushrooms (chanterelle link)
Garlic, etc:
- 2lbs garlic cloves (I used some straight from my freezer)
- Saffron (0.115oz or 3.3g):
- You can find saffron here, but I stocked up over several trips to Trader Joe’s
- Fining agents (optional)
- I prefer using kieselsol and Sparkolloid back to back. My reasoning is elaborated on towards the end of the instructions
Note: I did the calculations for the mushrooms and garlic ahead of time, trying to scale up from the 1-gallon version in Make Mead Like a Viking, but I think I also used some figures I found online to calculate how many dried mushrooms to use.
Equipment

- Sanitizer (I like to use Starsan)
- Fermenter (I would recommend a wide-mouth fermenter such as this glass one or this metal one)
- Airlock and stopper
- Pan for dry-toasting saffron
- I used a Hexclad because I wanted something nonstick, nontoxic, and wouldn’t leave any oily residue like a cast iron pan would
- You could probably use a nicer nonstick pan like a T-Fal or a stainless steel skillet as well.
- Pot for making mushroom tea
- Strainer for straining mushroom tea
- I have a chinois (conical) strainer that I bought for making soups and stocks, so I used that. It worked well, and was probably more hands-off than using a mesh strainer.
- Sous vide circulator (optional), to heat the honey bottles
- I like to use an Anova sous vide circulator
- Autosiphon
- Silicone hose (5/16″ ID)
- I much prefer silicone over vinyl tubing. I think I went into this at length in this post.
- Automatic bottle filler
- I use this Ferrari Auto Filler, though there are some others out there, such as this one made by Buon Vino. The one I have has a bit of a learning curve, but it’s really sped up the bottling process for me.
- Floor corker
- And don’t forget corks. The #9 sized corks are best for aging mead stored sideways, but #8 is fine if you’ll drink it all soon.
Instructions
Base Mead
I started with a base mead recipe of 5 gallons spring water and 15lbs of honey, Fermax yeast nutrient, and Lalvin EC-1118 wine yeast. When I started this batch, I was also starting a new batch of my Rooibos-Coffee Mead, which begins with the same base mead.


When making any mead, I like to gently heat the honey using my Anova sous vide circulator to 94°F (34.4°C) for a few hours. The honey flows better, but it isn’t enough heat to drive off volatile aromatics.
Side note: This probably matters more if you’re making an unflavored mead, but I also think a low temperature is better if you want to avoid your mead tasting like jet fuel when you first bottle it.
I also like to step-feed my honey, because I find that the overall fermentation time seems shorter on average, and you don’t stress the yeast too much from osmotic pressure. I add 10lbs of honey to start with, then the remaining 5lbs after fermentation slows again. Degassing regularly also helps speed things up and keep the yeast healthy.
Once fermentation has slowed again, rack into secondary.
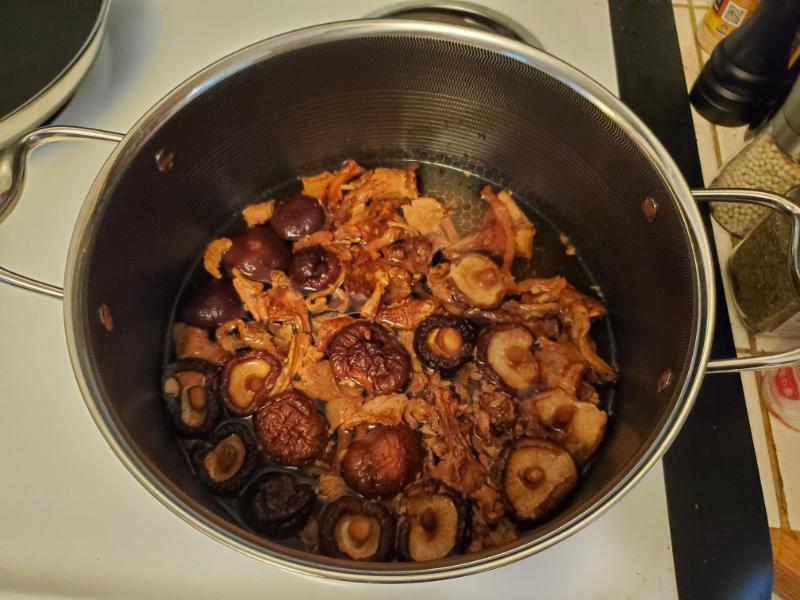
Mushroom Tea
After researching my options online, I decided to go with a mushroom tea. I soaked 18 dried shiitake mushrooms and 36 dried chanterelles in a pot for 30 minutes.

I then removed the mushrooms with a slotted spoon and chopped them on a cutting board before returning them to the pot.


After returning the mushrooms to the pot, I brought it all to a boil and then reduced to a simmer. I simmered them for 40 minutes.


While the mushrooms were simmering, I added 2lbs of garlic cloves straight from my freezer into a sanitized carboy. My hope here was to use the frozen garlic to cool down the mushroom tea once it was added.

Finishing Up
I dry toasted 3.3g of saffron threads in a skillet, then added that on top of the frozen garlic. In the future, I’d probably add the saffron at a later stage, like after I’ve removed the garlic from the mead. Notes for next time I guess.


Once the mushrooms were finished simmering, I used a chinois conical strainer to strain the mushroom tea into the carboy. I think this worked really nicely, because the conical strainer just sort of sat in the wide mouth fermenter and I didn’t need to steady it much by hand.
I also pressed down with a wooden spoon to try and force as much liquid through the strainer as possible.


Once all the flavorings were added to the carboy, I racked the base mead onto them.

After this, I allowed the mead to steep with the garlic, mushroom tea, and saffron for a few more months. I checked on it periodically by taking off the lid and smelling: at first it just smelled like alcohol, but after a while that dissipated and I was left with the strong aroma of garlic.
Degassing more regularly during this time might’ve sped things up, so I’ll have to remember to test that next time.

A couple of months later, it was ready to bottle. I ended up racking several times and then adding fining agents (kieselsol and Sparkolloid) to get rid of any sediment or haze, but once that was done, I was left with a very beautiful, clear mead.
Side note: Most two-part fining kits come with kieselsol and chitosan which I’ve used before and they work beautifully. However, chitosan is derived from shellfish, so for my buddies who keep kosher or have shellfish allergies, I began using Sparkolloid (which is made polysaccharides and diatomaceous earth) instead.
Bottling
Once the mead was fully clarified, it was bottling time. I sanitized more bottles than I thought I would need, attached my autosiphon, silicone tubing, and auto bottle filler, and began filling.


I managed to get a little over 26 bottles from this batch. Note that I like to sanitize a swing-top bottle to fill with any mead that won’t fill a whole wine bottle. I typically take sips from this bottle over the few weeks to see how the taste is developing.
Labeling
I began labeling meads a few years ago, mostly because I got tired of writing a lot of labels by hand. However, I’ve come to enjoy designing these labels, and the one I designed for this mead was particularly fun.
I use an online service called Canva to design my labels; the have a lot of pre-existing templates that you can tweak to your liking. They even offer a service to print labels and stickers for you. However, I prefer to download the images and print them myself on Dashleigh waterproof labels.
Label Design Process
This time I really wanted to showcase the ingredients that went into the mead. This meant that I was looking for images online of those ingredients that were presented in the same style, which proved to be difficult.
In the end, I decided to use some prompt engineering skills I’ve been taking classes on, and got GPT-4/DALL-E to come up with some images for me. The prompts followed the template “give me an image of [item] in an old-fashioned woodblock print style”. I asked for several iterations, but settled on one image each for garlic, saffron, shiitake, and chanterelle. Four images total.
Once I got a set of images that I liked, I edited them in GIMP to make the background transparent and to make the images a little crisper. What I got at the end was this:


And that’s it. I’m excited to see how the flavor of this mead develops, and I have a lot of plans for it already.
Listed Instructions
- Base Mead: My usual approach to a base mead is just to mix together the honey, water, yeast, and Fermax yeast nutrient.
- Gently warm the honey first to make it flow easier. I like to stick whole bottles of honey in my sous vide setup and set it to 94°F (34.4°C) for a few hours; this makes the honey flow better, but isn’t high enough to drive off volatile aromatics.
- Pour honey into water and mix. I like to only add 2/3 (10lbs) of the honey at first, then add the remaining 1/3 (5lbs) once fermentation slows down; this seems to produce a faster overall fermentation, as it stresses the yeast less.
- Add in wine yeast and yeast nutrient.
- Once all honey has been added and fermentation has subsided, rack into secondary and clarify.
- Mushroom Tea: Soak dried mushrooms (18 shiitake, 36 chanterelle) in 6 cups of water in a pot or sauté pan for 30 minutes.
- Remove mushrooms, chop coarsely, and return to pot.
- Bring pot to a boil, then reduce to a simmer. Simmer for 40 minutes.
- Allow to cool, then strain.
- Finishing Up: Dry-toast 3.3g of saffron in a frying pan, then add to mead.
- Add 2lbs garlic cloves to mead (I did this straight from the freezer, hoping that the drop in temperature would cool my mushroom tea faster once added).
- Add strained mushroom tea.
- Allow mead to steep until you instantly smell the garlic once you open the fermenter. This can take a few weeks, and I think that degassing the mead helps at this stage as well.
- Transfer fully-steeped mead a few times to clarify. Use fining agents or filtration as needed.
- Bottle, age, and enjoy!
Tips & Tricks
I think next time I make this mead, I’ll add the saffron after racking the mead off of the garlic. I feel like the saffron ended up really coloring the garlic more than the mead itself this time through, because they all settled to the bottom.
When bottling, you may experience some “bottle shock” for the first few weeks. This is common for mead in general, where the full flavor of the mead sort of ‘retreats’, only to re-express itself after a period of aging.
Usually I don’t think anything of it, but in this mead in particular, it was really noticeable at first. For the first few weeks, it tasted a lot weaker than when I took a taste from the carboy right before bottling.
Possible Culinary Uses
As I stated earlier, any recipe where you need a deglazing liquid or even just a flavor enhancer would be a good use for this mead. I want to use it in a seafood bisque, and on that note you could also use it in place of sherry in something like Lobster Thermador.
I’d also use it in similar things that I (or my mom) have used the straight-up garlic mead in the past, such as soups, stews, and even Ragu Bolognese.
Any such recipes I post using this mead in the future will more likely be posted to my cooking-focused blog: Cooking Mischief.


