A guide to apple cider pressing, using freshly picked apples.
Originally Posted: September 2, 2020

Table of Contents
Intro
Basic apple cider was my first true foray into the world of homebrewing. I had brewed a beginner’s stove-top beer kit before, and had even taken a brewing class at a local homebrew store, but cider was the first thing I had ever made at home. However, for most of those early experiments, I used store-bought apple juice.


Apples, pre-chopping. 
Apples being crushed. 
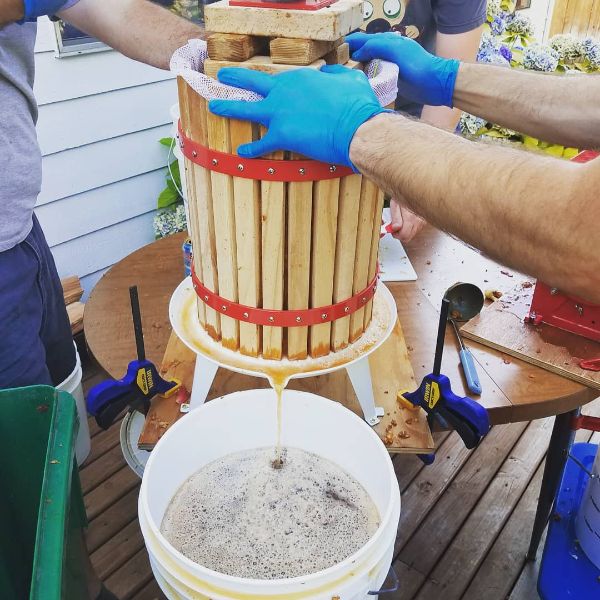
Straining the juice into a fermenter 
If you let your yard waste bin get this full, it’ll be hard to get it out to the curb. Just a heads-up.
Late in the summer of 2019, I got the chance to press apples into fresh juice for the first time. Over the course of two weekends, I got together with some friends and we crushed and pressed 650 lbs. of apples that had been collected from several of their parents’ yards, yielding about 24 gallons of juice that would become cider.
Since that first cider pressing day, it appears that it’s going to become a yearly thing. I even bought a sturdier all-steel apple press to bring to future pressing days.

Brief History
The earliest method of making cider from apples was likely to crush them by hand in an enclosed area, somewhat like a large mortar and pestle. Crushing by hand was eventually replaced by the horse-mill, followed by the roller mill. Both greatly sped up the process of crushing large amounts of apples.
After being milled, the apples could be pressed to extract juices. The press could be lever powered, screw powered, or much later, hydraulic. Today, many modern cideries use belt presses to process large amounts of apples quickly. Meanwhile, homebrewers usually use a screw-driven hand press.
Ingredients
- Freshly picked and rinsed apples
- Your choice of yeast (we tried out several)
- Yeast nutrient
- Pectic enzyme (optional, if you want a clear cider at the end)

Equipment
- Fruit press (many local homebrew stores can rent these out)
- Food-safe lubricant (like keg lube) for the threading on the press
- A Stainless Steel Fruit Press is a sturdier version, and worth the extra expense if you think you’ll press apples every year. It’s also somewhat easier to clean.
- Apple crusher (like the press, these can be rented)
- Knives and cutting boards
- Fermenters
- Sanitizer
- Lots of extra buckets and containers for whole apples and crushed apples
Instructions

Overview
For a cider pressing day (or days), you’ll need about 5 – 6 people minimum. More is better, especially if you decide to use more than one apple press (on the second year of doing this, we had 8 people and two apple presses). My friends had already gathered all the apples into plastic bins with small drain holes cut into them. The apples were rinsed with a hose as we went along.
We organized ourselves into several stations: one person rinsing and transporting apples, two people roughly chopping apples with a knife (cutting into eighths works well), one person to run the apple crusher, and two people running the hand press. In the second year, we had at least one extra person chopping apples throughout the day, plus 1 – 2 people on each apple press.

Process
Prep
- Wash apples to remove any dirt or debris.
- Roughly chop apples into eighths, discarding any that show obvious signs of rot or insects.
- Throw chopped apples in crusher. Running the crusher can feel like slow work at first, but once you get it going it’ll chew right through all those apples.
- Keep enough spare buckets around to store crushed apples while they wait to be pressed.
- Line your apple press(es) with mesh bag (usually included with purchase or rental, but it’s good to keep backups around). Load press with crushed apples until it’s mostly full. Fold edges of mesh bag over the top of the apples as best you can.
- Press juice out of apples and into a sanitized fermenter of your choice. We often use food-safe buckets and swap out for new ones as the buckets get full. Enjoy tasters of fresh juice as you work, it’s worth it.

Finishing
- Repeat the above steps 1 – 6 until you run out of apples or empty fermenters.
- Use a hose to rinse off all your tools as soon as you’re done.
- Add pectic enzyme (optional), yeast nutrient, and yeast of your choice. If you don’t want any chance of wild yeasts taking hold, add some Campden (potassium metabisulfite) and wait 24 hours before adding yeast of your choice. Alternatively, you can just let the wild yeasts ferment the juice if you want a wild-fermented cider.
Yeast Notes
For the first cider pressing day in 2019, six yeasts or yeast blends were chosen with some very tasty results: 1) natural (wild-fermented), 2) Saison yeast, 3) Cider House / Saf Cider blend, 4) English Cider yeast, 5) Cider House alone, and 6) Saf Cider alone.

A lot of beginner recipes out there suggest the use of champagne yeast, but a dedicated cider yeast is better suited for metabolizing the nutrients in apple juice. All the cider yeasts performed well and made ciders ranging from dry to semi-sweet.
The Saison yeast was an interesting case, as I’m told that it added some Saison-style esters and phenols that clashed a bit with the apple-ness that one expects from a cider. However, this mostly aged out of the Saison ciders within a few months and made for a complexly dry cider.

Tips & Tricks
Remember to keep the threads for your apple press lubricated with food-safe lubricant. Even though the threaded parts of an apple press are made of steel, insufficient lubrication can cause the threads to gall after repeated use. If threads do begin to gall, keep a file handy to deburr the threads.

